You are here: Home > , , > Windows 7 Coolest Features

Windows 7 Coolest Features

Windows 7 is an extremely high defined and high speed operating system with enhanced features and reliability. You can have an amazing experience of its features. This article highlights these features which Windows vista do not have unless you do not seek an expert vista help. So what is new in Windows 7 ?

Let’s see!!

1. Shake it off
Well have you ever accessed 40 outlook, 10 notepad and 3 PowerPoint at the same time? IN addition to this you can minimize them all and have the option to open the one you want. Also you can take the top of window and shake it off to move all the other open windows.

2. Jumplists
Jumplists are a new feature that gives you the option to view a list of recently accessed files by application, even when the application isn't open, by right-clicking on the application's icon in the taskbar.


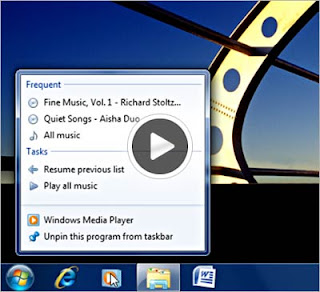
Jump Lists takes you straight away to the documents and websites you open every day. It allows you to swiftly access your favorite playlist without opening your player. Jumplists can also be found into the Start Menu.

3. Easily adjust multiple displays
Do you instantly want to connect your computer to any other external monitors or projectors? Try Win + P, and duplicating your display to the other monitor takes a few moments. Win + P is ideal if you give a lot of presentations at work on your laptop.

4. Record problems
Another mesmerizing feature of Windows 7 is that you have the option to record a particular problem you are having with your system so you can look out for Windows 7 support with an expert. You simply need to Click 'Record'.


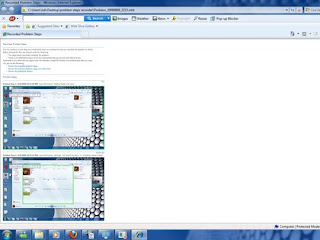
These screenshots (and comments, if any) are placed in a well-formatted HTML document that is saved in a zipped folder on your desktop –just fine to get attached to an email.
  • Digg
  • Del.icio.us
  • StumbleUpon
  • Reddit
  • Twitter
  • RSS
You are here: Home > , , > Internet Explorer 8 Problem in Windows 7

Internet Explorer 8 Problem in Windows 7

The latest version of Internet Explorer offers greater security with many features including incognito surfing. However, there are reports that internet explorer problem are very annoying and hangs frequently and takes much time to load. There has been complains that Internet Explorer 8 is very sluggish and makes download and upload very time taking especially on windows 7. This blog explains how to fix internet explorer problems.

But before this take into consideration that you have a good internet connection. Despite good internet connection you are facing internet explorer problem, then try the following:

Disable all add-ons
One of the main reason for slow internet explorer in Widows 7 could be its add-on. Though add-ons can boost your internet experience but sometimes they interfere or conflict with other software on your computer. Try setting Internet Explorer 8 without add-ons to see if the problem goes away.
Follow these steps for it:


Click the Start button Picture of the Start button
• Click All Programs
• Click Accessories
• Click System Tools and then click Internet Explorer (No Add-ons).
If disabling all add-ons solves the problem, then using Add-on Manager will allow you to figure out which add-on is causing the problem s you can disable all add-ons and then turn on add-ons only as you need them.

Reset Internet Explorer settings
If disabling add-ons doesn't work then you need windows 7 support to fix internet explorer problem. You can do this by resetting IE 8 back to its default settings. This removes all changes that have been made to Internet Explorer since it was installed.
Follow these instructions to reset IE8:
• Close all Internet Explorer or Windows Explorer windows.
• Open Internet Explorer by clicking the Start button Picture of the Start button, and then clicking Internet Explorer.


• Click the Tools button, and then click Internet Options.
• Click the Advanced tab, and then click Reset.
• Click Reset.
• When you are done, click Close, and then click OK.
• Close Internet Explorer and reopen it for the changes to take effect.

Update Internet Explorer
Running Windows Update has also evolved to be very effective in fixing problems as it can often correct problems by enabling virus removal and replacing out-of-date files and fixing vulnerabilities.
Here’s how you can update it:
Open Internet Explorer by clicking the Start button Picture of the Start button, and then clicking Internet Explorer.
Do one of the following:
• Click the Safety button, and then click Windows Update.
• Follow the instructions on the Windows Update page and it will get updated.

Note: If you cannot open Internet Explorer or if it opens briefly and then closes, the problem might be caused by low memory or corrupted or missing system files. Restart your computer to clear the memory and then open Internet Explorer by itself.
  • Digg
  • Del.icio.us
  • StumbleUpon
  • Reddit
  • Twitter
  • RSS
You are here: Home > , , , > iPhone Won't Sync with Windows 7

iPhone Won't Sync with Windows 7

Annoyed iPhone users have reported major issues in getting their iPhone to sync with Windows 7 systems. Well it has been observed that mostly Windows 7 system with P55 chipset is facing such problem. There is some problem identifying iPhone (though not always) , but iTunes discovered that it can't connect to the unit because of an "unknown error" called 0xE8000065.
Moreover, the phone connects and everything seems fine, but iTunes can’t connect to it. You’re not alone. Many users have reported this problem. The problem seems because of faulty Intel P55 chipset, but not always.
Therefore, if you’ve recently upgraded or purchased a new machine with Windows 7 installed and you’re an iPhone user you might have encountered the annoying 0xE8000065 error when trying to sync your iPhone with iTunes then in that case you will require windows 7 support. This blog will help you in fixing this problem for most users.
Here’s the solution:

Solving the 0xE8000065 “unknown
error”.

The primary remedy to this problem has evolved, that it works fine in case USB power management has been disabled. This solution seems to be working for most people. On the other hand there is no need to troubleshoot vista for it as no problems have been reported in Windows vista in this case. However Windows 7 tries to control devices and “turn them off” when not used. This feature is not essential and it seems that Windows 7 P55 chipset drivers are defective so it won’t work anyway. Thus, the solution is simply to turn off that feature.

Disable USB Power Management in Windows 7

Just follow these steps:
• Disable USB Power Management in Windows 7
• First, click the start button, and type devmgmt.msc followed by the enter key.
• Under Universal Serial Bus Controllers, you will find one or more USB Root Hub devices.


You’ll need to follow these steps for each one listed
(unless you know the exact one your iPhone is connected to). Right click the USB Root Hub device and then click properties.


• Under the Advanced tab uncheck the box next to Allow the computer to turn off this device to save power. Click OK and close everything. Reboot your PC after this tweak and try again.


From what we’ve seen, this solves the 0xE8000065 “unknown error” on about 90% of the machines out there.
  • Digg
  • Del.icio.us
  • StumbleUpon
  • Reddit
  • Twitter
  • RSS
You are here: Home > , > How to fix Network & Internet connection problems in Windows 7

How to fix Network & Internet connection problems in Windows 7

Well internet connection and network issues have become a very common problem users are facing these days. However there is no need to panic. This blog deals with windows 7 support relating to fixation of Network & Internet connection problems in Windows 7:

1. Well one of the important technique of getting rid to this problem is to use an in-built Windows 7 tool called IPconfig.It displays all current TCP/IP network configuration values and refreshes Dynamic Host Configuration Protocol DHCP and Domain Name System DNS settings. You can open this tool via the command line. This method is very helpful in case you have a weak or bad IP address.

  • Type cmd in start search and press Ctrl-Shift-Enter.
  • Type ipconfig /release to let go of the current IP address.
  • Next type ipconfig /renew to obtain a new IP address.
  • If you get an error Message When You Run the “Ipconfig /Renew” Command see KB810606.


NOTE: If you repeatedly face this problem, then you can have it renewed on every start-up, by creating the following .bat file and placing it in your startup folder.


Open notepad and type:

· ipconfig /release

· ipconfig /renew

· Save it as, say, iprenew.bat file.

2. Another reason for having internet explorer problems concerning it’s connectivity could b

e a corrupted DNS cache. Refreshing or flushing it out is a convenient solution to this problem. Follow these steps to get rid of this issue in Windows 7:

Start > All Programs > Accessories > Command Prompt. Right click on it and ‘Run As Administrator’. Type the following and hit enter:

Ipconfig /flushdns

A confirmation dialog will appear on the screen:

“Windows IP Configuration. Successfully flushed

the DNS Resolver Cache.”

Next type ipconfig /registerdns and hit Enter.

This registers any DNS records that you or some programs may have recorded in your Hosts file. Moreover typing ipconfig /help will show the complete syntax for this command.

3. Another important method of fixing internet connection problem in Windows 7 is to use the the Network & Internet Diagnostic & Repair Tool of Windows 7. It will help you in identify the potential issues preventing network connectivity, and it automatically takes suitable steps toward correcting them. If a computer on the network loses Internet connectivity, you can graphically see which connection is down and then use Network Diagnostics to help determine the cause of the problem and find possible solutions.


To access it, open Control Panel > Network & Sharing Center. In the lower part, click on Troubleshoot Problems. From the window which opens, you can select Internet Connections or any other issue you want to troubleshoot and repair.

  • Digg
  • Del.icio.us
  • StumbleUpon
  • Reddit
  • Twitter
  • RSS
You are here: Home > , , , , , > How to overcome Windows 7 Hang problem

How to overcome Windows 7 Hang problem

Windows 7 hangs or becoming impassive is a frequent issue Microsoft users have discovered when using this latest operating system. This hanging problem is random. Operating system hangs on the welcome screen just after login. It can also hang during shutdown. The programs you opened can stop responding including your mouse and keyboard. This is somewhat annoying especially if you are working on some important issue. There are in fact various causes responsible for this trouble, and following are the main reasons why Windows 7 hangs along with their related fixes:

Viruses and Spyware: Malicious files may be thrashing your system. These malware alter your files and hamper your computer's performance causing Windows 7 to finally hang. Keep your virus definitions always updated. Always scrutinize your computer to detect these bugs and spyware then remove them.

Too many programs running at once: This will use more virtual RAM (Random Access Memory) than your system can handle. Don't open a lot of applications simultaneously. Reduce the number of software and websites currently running. If you work heavily on various applications, then upgrade your RAM to at least double what you are using now.

Corrupt Windows Registry: The registry contains data and settings Windows 7 references during various operations. This database ultimately becomes chaotic because of redundant and outdated entries leaving it degraded. It is advised to clean your Windows registry to erase those unnecessary entries. To clean the registry manually is not possible though because the registry is considered as the brain of your computer and is complicated to a great extent. A minor alteration or mistake in an entry can cause major harm in your operating system. Diagnosing your system with a registry cleaner is the best solution to solve registry problems.
  • Digg
  • Del.icio.us
  • StumbleUpon
  • Reddit
  • Twitter
  • RSS
You are here: Home > , > Speed Up Windows 7 in Few Simple Ways

Speed Up Windows 7 in Few Simple Ways

Windows 7 is still a pretty new operating system on the market, and all the kinks and new features are being worked out. But on question that always comes up with the OS are there speeds. Wondering just how to speed up the Windows 7 operating system? And want to do it without spending money, well there are certain things you can do to speed up the new operating system.


The first thing is of course, make sure your system can handle the minimum requirements for Windows 7. Most systems can handle it, however, it is always good to double check and have all your necessary equipment to run the OS smoothly. Here are the core requirements for running the new Windows 7 operating systems.

o 1GHz processor (32- or 64-bit)
o 1GB of main memory
o 16GB of available disk space
o Support for DX9 graphics with 128MB of memory (for the Aero interface)
o A DVD-R/W drive

Many people are just upgrading form Windows XP or Windows Vista, and if your computer was running great on those systems, especially Vista. Then upgrading Windows 7 shouldn't be any problems with your system. Just make sure you back everything up before you do the upgrade.

With this new operating system, it is designed to run efficiently, and run smooth without consuming much of the physical RAM. However, if for some reason you are still running Windows 2000 or early, then it is guarantee that you are going to have problems upgrading to the new Windows 7. If this is your situation, then look at the list of requirements listed above, and try to upgrade your computers equipment to meet those settings, before you upgrade to Windows 7.

After you have done the upgrade and your OS is still running slow, or you just want it to be as fast as it can be. Or if you're like me, you just enjoy customizing every aspect of your computing experiences, to your own personal settings. There are some things you can do to make it run faster and smoother.

The first thing is to cut down on making your computer work harder. Many times, computers run programs in the background. Which means, programs the computer is running, without you opening them, or needing them open.

The number one cause for this, is when you install things. Many times the software will ask you if you want the program to run when the windows is starting up. Always say no to this, because it eats up the computer resources.

You can always change the settings, if you change your mind and want it to run at start up. In order to check to see how many programs your computer is running, just right click the start bar, then select "Task Manger" down in the bottom left hand corner, you will see a number. That is how many programs your computer running. The lower the number, the more recourses you have free on your computer, which means the faster your computer will perform.

Just as a side note, there are some programs, that windows must have running, and if you try to end them. Windows will not allow you to do it. However, if you find programs that you want to be closed, and not to start up during start up. Then there is a simple procedure you need to perform.

Go to your start menu, and click on the item called "Run". After you do that, a little box should appear, and an area where you can type in a command. Type in this command "msconfig" and a second program will appear. You should see this one has many tabs, find the one that says "Start Up".

Then all you have to do is, uncheck the programs you don't want to have running in the background. After you have unselected the programs, click apply and then ok. The computer will prompt you to restart the computer, so the changes take effect. To reverse the process, just do the same thing, but check the programs you want to be running.

You should notice a big difference in the way your computer is running after that. Especially, if you are running a bunch of programs.

The second thing you should do, is the Windows registry. Now, I would touch the registry if you don't know what you are doing, because if you mess up the registry of windows. You run the risk of messing up the entire system. And will have to delete and start all over. With this method, there isn't any internal cleaning tool, so you will have to do this manually. What we will be doing is cleaning up the errors and corrupted files in the registry.

Over time this will build up, and is a natural effect of running your computer. Programs will just randomly create errors. And over time, this can create an congestion in your registry. So if this is still a new installation on your system. I wouldn't worry about his all too much right now. However, if you have been running Windows 7 for some time now, then it may be good to clean out your register.

While it will take more time, and advance knowledge of how the register works, this will increase the speed in which your computer process info. There are programs you can purchase, that will do this job for you in only minutes. If you have done the first thing mentioned in this article, and you haven't seen an increase in speed, then purchasing a good registry cleaner is the next step.

Upgrading to Windows 7, is the easy part. Customizing it to run efficiently as you can on your system is where it gets fun. Just remember if your system ever starts to slow down, check to see how many programs it is running in the background. Reduce that number as much as possible, then clean out the register with a good register cleaner, and you computer should be up to speed, so to speak.

  • Digg
  • Del.icio.us
  • StumbleUpon
  • Reddit
  • Twitter
  • RSS
You are here: Home > > How to Recover Deleted Files in Windows 7

How to Recover Deleted Files in Windows 7

When you delete a file, you'd better be sure that you really want it gone--if you make a mistake, it's a hassle to get it back. This is especially true on newer systems, but data recovery is almost always possible on deleted files due to the way that Windows is set up. And yes, this applies to Windows 7, too.

Here's a look at how deleted files can be recovered in Windows 7.

1. Data recovery software. The biggest impetus to deleted file recovery in Windows 7 is the lack of software designed specifically to recover files in the operating system. That's not to say that there isn't any data recovery software for the OS, just that it's not designed exactly for Windows 7's environment.

That's good news. Most data recovery programs that work for Windows XP and Windows Vista are compatible with 7. You basically have your pick; some of the most common programs, like OnTrack's data recovery tool or Datarecovery.com's software will work well with deleted files in 7.

2. Data recovery companies. You can also send your drive to a data recovery company, as they're usually able to easily retrieve deleted files. Unfortunately, "easy" doesn't translate to "free." Data recovery companies will charge an average of about $400 to recover deleted files. It's worth the money if your files are especially important, and if you don't feel comfortable handling the file recovery on your own. Shop around, and look for consumer reviews.

3. Important steps to avoid data loss. You might wonder what happens when a file is deleted in 7, and even if you've never wondered that, too bad, because I'm on a roll and I'm going to explain it. The operating system deletes references to the file, and marks the space that the file occupied as "available." When new programs are installed, or new files are written, the deleted file is overwritten. Once something's overwritten, data recovery becomes difficult if not impossible. More bad news: as long as your computer is on, it's writing files somewhere. There's simply a ton of stuff going on in Windows 7, and you can't stop it from writing tiny, tiny bits of information.

For this reason, if you accidentally delete a file in Windows 7, it's absolutely important to shut down the computer ASAP. Access the data from another computer; if you need help with this, refer to the documentation with your recovery software. You really can't install the data recovery software onto the same drive, or you'll permanently overwrite your files. Good luck.

You can also avail online tech support services to make the process smoother. Have you had issues with deleted files in Windows 7? Post in our comments section below.
  • Digg
  • Del.icio.us
  • StumbleUpon
  • Reddit
  • Twitter
  • RSS
You are here: Home > > How to fix printer issues in Windows 7.

How to fix printer issues in Windows 7.

Windows 7 is an exciting, awesome operating system. Less exciting is all the tiny things you'll need to do to get it running flawlessly--finding drivers, installing your favorite programs, etc.
Printers can be an especially big pain when you're working with a new OS. Here's a quick troubleshooting guide to help you out if you're having printer issues in Windows 7.

1. Check that you're using the right printer driver. All printers require a specific matched printer driver in order to operate correctly. Make sure that your Windows 7 computer has the correct driver for the printer that's hooked up to it. To do this, go to Start, Control Panel, and view your printers. The name of the installed printer should match the name of the printer that you're using. If it doesn't, or if you haven't installed a driver, visit the website manufacturer of your printer. Their "support" section will often have the latest drivers. Some printer manufacturers haven't made drivers for Windows 7 yet for all of their products. If this is the case, you should be able to use Windows Vista drivers, as they're very similar.

2. Install all Windows 7 updates. The updates in Windows 7 contain a lot of bug fixes, and they can help to get a printer working, especially if you're using a network attached printer. Run Windows 7 Update regularly. Remember to completely restart after installing any updates, as this gives Windows 7 a chance to apply the changes. For the best results, install all of the recommended and optional updates that Windows 7 offers you.

3. Check your printer manufacturer's website for tips. If you're still having trouble, look for a support forum for the printer you've purchased. These are usually easy to find on the manufacturer's website. Post about your problem, and be sure to include as much information as possible. You should be especially sure to note that you're using Windows 7, the model of your printer (exact), and anything that you've tried to do to fix the problem.

4. Don't neglect the obvious stuff. Most printer problems are actually very, very simple. Check all connections to make sure that you're actually connecting to your printer. Restart the printer, and if it's on a network, check to see that Windows 7's firewall isn't inhibiting your computer's ability to communicate with the printer.

For more assistance you can get online tech support services any time. Do you have any other tips for fixing printer problems in Windows 7? Post in our comments section below.
  • Digg
  • Del.icio.us
  • StumbleUpon
  • Reddit
  • Twitter
  • RSS
You are here: Home > > How to Make Windows 7 Boot Faster !

How to Make Windows 7 Boot Faster !

Does your Windows 7 boot slow? Wondering how to make Windows 7 boot faster without paying much? Maybe I can help you!

As a latest operating system, Win 7 Integrated more services and applications than any others in the past. With many programs run at startup, Windows 7 will boot slow as a tortoise. These programs not only occupy vast hard drive space, but also lengthen the boot up time greatly. So, more and more users want to know how to make Windows 7 boot faster now.

Of course, you can buy a new computer to make windows 7 faster quickly. But it will cost you much. And no matter how fast a new PC might be, it will get slower over time. So it doesn't mean that you don't need to optimize it again.

The easiest way to make Windows 7 boot faster is to manage your startup items and services. Thinking that if you get more than 50 items and 100 services run at startup, how to make Windows 7 boot faster?

Click Start and input "msconfig" in the Run box. Then point to OK and press. You will see all services and applications that are started automatically when your computer boots. Disenabling some unnecessarily items and re-boot your computer. Your Windows 7 boot up will never be slow again.

But please do it carefully since some services and startup items are very important to Windows. Removing them in error will cause serious problems even system crash. It's not funny at all. So you'd better select some popular tools to do it for you.

If you have done everything but Windows 7 boot is still slow or you want a good technician to make the things smoother for you approach www.pccare247.com

  • Digg
  • Del.icio.us
  • StumbleUpon
  • Reddit
  • Twitter
  • RSS
You are here: Home > , > Make Your Windows 7 Run Faster

Make Your Windows 7 Run Faster

Even though it's the latest version of Windows, many people are finding that Windows 7 running extremely slowly. This is a big problem that even the most advanced computer users are unaware of how to fix. Luckily, there's an easy way to fix windows 7 common issues even if you're a total beginner.

The problem of a slow computer is actually very easy to fix if you know what causes the problem in the first place. The problem is actually caused by a part of Windows called the 'registry', which is a big database that stores all the settings and information for your computer. It's basically a huge collection of 100,000's of files, which tell your computer how to do everything from load up your emails to log you in. The registry is very important, but it's also one of the biggest causes of slowness for Windows 7.

The registry causes your computer to run slow because it's being used too much. It has all these important files inside, all of which are essential for Windows to run fast. But because there are so many, your computer is constantly trying to open as many of them as possible and ends up with 100's open at a time. This is very bad, because it means that your system constantly gets confused about which registry files it has open, making it save many of these important files in the wrong way, corrupting them and making them unable to be opened quick enough by Windows.

When registry files become corrupt, their contents are mixed up - as if they've been put in a blender. This makes them very difficult for Windows to read, making your system take longer to read the files, slowing it down. This problem is the main reason why Windows 7 will run slow, and because your PC is unable to fix the files itself, it ends up having 1000's of corrupt registry files all making your PC run slower and slower. This problem is huge and not many people even know about it because the registry is hidden from view. However, there's an easy way to fix it.

To fix the corrupt registry files that are slowing Windows 7 down, you can use a registry cleaner tool to scan through all the registry files on your PC. This will allow your computer to make the most of the registry files, speeding up your system dramatically. You just need to run the registry cleaner and it will clean all the corrupt registry files from your PC automatically, speeding it up.

  • Digg
  • Del.icio.us
  • StumbleUpon
  • Reddit
  • Twitter
  • RSS
You are here: Home > > How to Make Windows 7 Run Fast

How to Make Windows 7 Run Fast

Even though Windows 7 is the latest operating system to come from Microsoft, many people are still reporting how slowly their new 7 PC is running. This problem has been with computers for many years and is still a major issue today. Fortunately, it's a problem which is actually very easy to solve in this version of Windows, thanks to a simple trick.

The way to fix any slow PC is to cure the problems that make it run slow in the first place. Windows has been designed to run as smoothly and effectively as possible in any circumstance - and the only reason why it runs slow is because your PC has problems such as errors or damaged system files. This means that in order to fix this problem, you need to be able to fix the issues that make your Windows 7 PC run slow.

The 'trick' that most computer technicians use is actually very simple, and revolves around the "registry" of Windows. The registry is basically a database which stores information and settings for your computer, and is where your PC stores information such as your latest emails, desktop wallpaper and even your screen resolution for your PC. Unfortunately, the registry database is prone to becoming damaged and corrupted, making Windows unable to read the files it needs from it. And because Windows requires 100's of registry files each time you use your system, this problem causes your PC to run slower and slower as it has to read the files it needs.

The issue of a corrupt & damaged registry is the main cause of Windows 7 running slow. And as you use your PC, more and more registry settings are becoming corrupt & damaged... making Windows run slower. It's like a vicious circle which eventually ends in your system being extremely difficult to use. In order to make Windows 7 run fast, the first thing that most computer technicians do is to clean out the registry database to make sure that it has no corrupt or damaged settings inside. To do this, you should open up a " registry cleaner" program which you can download from the Internet, and let it can your PC.

The trick is to first download & run a registry cleaner tool to clean out any of the damaged or corrupted settings that Windows 7 has inside it. These software programs scan through your system and remove any of the damaged or corrupt settings that your PC has slowing it down, allowing Windows to run smoother and more reliably. Getting a good registry cleaner - which can remove the largest number of registry errors from your system - can actually make your PC run like new. New PCs don't have any corrupt or damaged registry settings to slow them down, so if you can use this trick to remove the largest number of registry settings, you could boost your PC speed dramatically.
  • Digg
  • Del.icio.us
  • StumbleUpon
  • Reddit
  • Twitter
  • RSS
You are here: Home > > Windows XP SP3 runs browsers 13% faster than Windows 7 RTM

Windows XP SP3 runs browsers 13% faster than Windows 7 RTM

In a set of comprehensive Windows Web browser performance tests conducted by Betanews on August 7 -- our first test of browsers running on the final Windows 7 RTM Build 7600 distributed by Microsoft yesterday -- the five major families of browsers tended to run 13% faster on Windows XP Service Pack 3 than on Windows 7, and 29% faster than on Windows Vista Service Pack 2.

That reflects a decline in the speed gap between XP and Win7 of about 1%, from tests conducted comparing XP-based browsers to those running on Windows 7 Release Candidate Build 7100. Some browsers are faster in Windows 7 RTM, although Mozilla Firefox 3.5.2 ran just a tick slower.

Our latest complete round of tests shows Google Chrome 3 continuing to make phenomenal gains with each iteration, with developer channel build 196.2 posting another record Betanews index score of 18.96 in XP, and 16.09 in Win7. In other words, on the XP platform, Chrome 3 performs with the relative horsepower of about 19 Internet Explorer 7 browsers running on Vista SP2. There's good reason to believe Google wants Chrome 3 to run particularly well on the older XP platform, which has enjoyed a huge resurgence as a result of installations on netbooks where Vista would either under-perform or not even fit. Apple's Safari 4 build 530.19 is the next best performer on XP with a 16.16 score.
  • Digg
  • Del.icio.us
  • StumbleUpon
  • Reddit
  • Twitter
  • RSS
You are here: Home > > How to Fix Windows 7 When It Fails to Boot

How to Fix Windows 7 When It Fails to Boot

Whether caused by a virus, a new operating system or by simple mistake, being faced with an "Operating System not found" or similar error during your computer system's boot up can be a nerve rattling experience. Assuming you have Microsoft's Window 7 installed however, do not fear, such a boot error can often be resolved in just a few simple steps.

First, check your BIOS and hardware

In many cases, having Windows 7 fail to boot may be as simple as having your BIOS set with an incorrect boot order sequence. It can be quite common if you have more than one hard drive installed in your computer and your BIOS gets reset. Usually you can access your BIOS seconds after your computer turns on by pressing the Delete button or by pressing a specific function key. Once in the BIOS, check to see that your system drive is listed appropriately in the boot order sequence; you may need to refer to your motherboard manual for help.

Another possible reason for Windows not being detected upon start up is a hardware issue. If your BIOS is unable to detect your system drive, check to make sure all the cables are plugged in properly. If your hard drive is making an odd noise, such as a clicking sound, your hard drive may be broken. Finally, it is possible that the hard drive is having data corruption issues, which has damaged important system data, such as the Master Boot Record (MBR). If you suspect a faulty hard drive, it may be a good idea to backup and scan your hard drive for errors from another computer and possibly consider buying a replacement. Trying to repair a boot problem on a damaged drive can possibly lead to even more data loss, so backup your data before attempting anything.

The MBR and other important boot data can also be damaged by trying to install an earlier version of Windows, such as Windows XP, alongside Windows 7 and by third-party programs, such as viruses. In the case of a virus, it is recommended that you run a virus scan of the drive before attempting any repairs as otherwise it could lead to more data loss. It is further possible to achieve the appearance of damaged boot data by having the wrong drive partition set to active, which can be the outcome of an overly curious Windows user with administrative permissions.

Fixing the MBR and other start up problems in Windows 7 is most quickly accomplished by using the Windows 7 Installation DVD. If you do not have a Windows 7 Installation DVD however, you can alternatively use a Windows 7 System Recovery Disc. If you do not yet have either a Windows 7 Installation DVD or a recovery disc, do yourself a big favor and create a windows 7 recovery disc right away to avoid any unnecessary headaches down the road.
  • Digg
  • Del.icio.us
  • StumbleUpon
  • Reddit
  • Twitter
  • RSS
You are here: Home > , > How to change active partition in Windows 7

How to change active partition in Windows 7

Upon purposely changing the active partition on my system drive, I was faced with a BOOTMGR is missing error during my system's start up that prevent Windows from starting. It is a common mistake to make when playing with partitions on a system drive and it can be a headache to solve if not prepared. To change your active partition back using the Windows 7 recovery disc or Installation DVD, follow the steps below.

Step one: Follow steps one to four in the above guide. This should take you to the Command Prompt in the Windows Recovery Environment.

Step two: Type DiskPart and then press Enter.

Step three: Type List Disk now and then press Enter. This command will list all disks attached to your computer and assign them a disk number.

Step four: Type Select Disk x, where x is the number for the disk containing the partition you wish to make active. Press Enter.

Step five: Type List Partition and then press Enter. You will now be shown a list of the partitions on the selected disk. Determine which partition you wish to make active.

Step six: Type Select Partition x, where x is the number of the partition you wish to make active.

Step seven: Now, just type Active and then press Enter. That should be it - the selected partition is now active.
  • Digg
  • Del.icio.us
  • StumbleUpon
  • Reddit
  • Twitter
  • RSS
You are here: Home > , , > How to Fix Windows 7 Master Boot Record (MBR)

How to Fix Windows 7 Master Boot Record (MBR)

Step one: Turn your computer on, booting from either your Windows 7 Installation DVD or Windows 7 System Recovery Disc. Remember, you may need to change the boot order inside your BIOS to have the your DVD drive boot first.

Step two: After the installation or recovery disc loads, if prompted, select your language settings and then continue. If you are using the installation DVD, when prompted by the following screen select Repair your computer.


Step three: The computer will take a moment now to scan itself for any Windows installations, after which you will likely be given a choice to select which installation you wish to repair. Select the appropriate Windows installation from the list and then continue. If by chance a problem is detected in one of your Windows installations at this initial stage, the system may also ask you if it can try to repair the problem automatically. It is up to you if you wish to let the system try to repair itself, but otherwise just select No.

Step four: Once you have reached the System Recovery Options screen, as shown below, you will be faced with a list of choices that can aid you in repairing a damaged Windows 7 operating system. If you wish to try the Startup Repair option first, it is often successful in automatically fixing many different start up issues, but in this article we will be using the Command Prompt option to resolve our problems manually. So, click Command Prompt to continue.


Step five: Now sitting at the command prompt, enter the following command and then press enter:

bootrec.exe /FixMbr

If successful, you should be greeted with the message The operation completed successfully. That's it! Your Master Boot Record has been repaired.

While the above command does fix the MBR, and sometimes that is enough, there still might be an error with the system partition's boot sector and Boot Configuration Data (BCD). This might occur if you have tried to install another operating system alongside Windows 7, such as Windows XP. To write a new boot sector, try the following command:

bootrec.exe /FixBoot

If you are still faced with your Windows 7 installation not being detected during start up, or if you wish to include more than one operating system choice to your system's boot list, you can try the following command to rebuild your BCD:

bootrec.exe /RebuildBcd

The above command will scan all your disks for other operating systems compatible with Windows 7 and allow you to add them to your system's boot list. If this fails, you may need to backup the old BCD folder* and create a new one in its place with the following commands:

bcdedit /export C:\BCD_Backup
c:
cd boot
attrib bcd -s -h -r
ren c:\boot\bcd bcd.old

bootrec /RebuildBcd

*Some users also find simply deleting the boot folder and retrying the above steps effective at resolving boot issues, but it is not recommended.
  • Digg
  • Del.icio.us
  • StumbleUpon
  • Reddit
  • Twitter
  • RSS
You are here: Home > , > Using Windows 7 on New Laptops

Using Windows 7 on New Laptops

Windows 7 was launched in a blaze of publicity, advertising a more 'user-friendly' system than its predecessor Vista. But many people found Vista and even XP more than adequate for their needs, so if you're in the market for a new laptop, why should you think about buying one with the new Windows 7 operating system, rather than the tried and tested Vista or XP?

Future-proofing

Future-proofing is the new buzzword in technology. One of the most frustrating things for people using older machines or operating systems is the incompatibility problems that arise with the latest software systems. Microsoft have invested a huge amount of money and time developing Windows 7, which is why there has been such a delay between the launch of Vista and this latest upgrade. Because of the 'understanding' that many manufacturers who use Microsoft have with the company, the launch of Windows 7 is bound to herald a flurry of upgraded laptops designed to use Windows 7 as its primary operating system. So buying a laptop that has Vista or XP rather than Windows 7 could mean that future software designed to run on Windows 7 won't run on Vista or XP operating systems.

However, if you only intend to use a laptop for web surfing, downloading media, emails and office documents such as Word or Excel, an older operating system could be just as effective as Windows 7. But with the wealth of new features available on Windows 7, it might be worth considering future-proofing yourself from the outset.

Upgrading - not exactly easy...

One of the biggest problems with upgrading is the limit imposed by the operating systems on just how easily you can upgrade Windows 7 without having to do a clean install. That means wiping your hard drive and basically starting again. For Netbook users this presents a huge problem, as many Netbooks do not have CD ROMS, and to do a fresh install you need to be able to slot that operating system CD ROM into the computer.

To avoid all the hassle of clean installs, wiping your hard drive and future-proofing yourself against future upgrades, it's wiser to start with Windows 7 as your standard operating system.

Security - a new level

One of the biggest worries for laptop users is the security aspect. Because of their portability, laptops are an easy target for unscrupulous hackers, opportunist thieves or even industrial espionage. One of the primary new features on Windows 7 is an improved level of security, something that'll make any laptop owner sleep a little better at night. Windows 7 also offers better taskbar features, an improved version of Windows Explorer to make surfing the 'Net easier and quicker and interface shortcuts that make it possible to run two applications side by side. For laptop owners with the advantage of dual core processing power, Windows 7 is tailor-made for laptop use. Microsoft have played it clever - they know full well that the market for laptops is a growing one, and Windows 7 is designed to grow with that market in tandem. By incorporating ideas that users actually want in an operating system, it may be some time before we see W8. So if you are thinking about buying a new laptop, it makes sense to get one with Windows 7 rather than the now considerably dated and troublesome Vista operating system.
  • Digg
  • Del.icio.us
  • StumbleUpon
  • Reddit
  • Twitter
  • RSS
You are here: Home > , , , , , , , > Win Ipod Nano and T-shirts From Moobell

Win Ipod Nano and T-shirts From Moobell


Moobell Presents IPL Season 3 Contest and Winners get Brand New IPod Nano and Tshirts.This contests takes place in Facebook. And you have to Predict the Result to win.

How to Participate:

  • Become a Fan in Facebook Fanpage.
  • Goto the Contest Application
  • Submit Your Answers Daily ie, Predictions
  • Wait For the Results the Next Day
SO Go Now and Start Predicting and Win an IPod Nano !
  • Digg
  • Del.icio.us
  • StumbleUpon
  • Reddit
  • Twitter
  • RSS
You are here: Home > , , , > Why my Windows 7 keep freezing

Why my Windows 7 keep freezing

Windows 7 have been accepted with a lot of praise by the tech community, a lot of people were excited to install the new operating system on their computers. The new operating system of Microsoft is designed to be much easier to use and faster than Windows XP and Windows Vista. Although it is elaborately developed by the inventive engineers of Microsoft, it still has some problems that often happen in the earlier Windows system. It becomes slightly slow and freezes up!

Why the freeze problem happens to the new system? How to Speed Up Windows 7? We must get to the cause of the problem. In Windows 7, Microsoft continues to use registry as the database of the operating system. That is, all the data and information of your programs, device drivers and operating system is still saved in the registry.

It is inevitable that the vital data and information that are saved in registry keys is damaged by some issues like invalid processes, bad program uninstallations and so on. Then there comes the problem. When Windows 7 performs a task, it must communicate with registry and then implement the task according to the data and information.

But if the data and information are damaged or incorrect, Windows 7 will not be able to perform a task properly. Then it would call off the task and stop responding in order to avoid serious damages to itself. That is the reason why your Windows 7 keeps freezing up. To fix the problem, you need to fix registry errors and repair the corrupt keys which the data and information are damaged.
  • Digg
  • Del.icio.us
  • StumbleUpon
  • Reddit
  • Twitter
  • RSS
You are here: Home > , > How to speedup your slow windows 7 experience

How to speedup your slow windows 7 experience

windows 7 support
All though Windows 7 is one of the best of its kinds, but the problem of windows slow startup have been noticed but a lot of users. Actually, you are not the only person suffering from this problem, a lot of people who use Windows 7 system also barge up against the annoying slow boot-up problem. What are the causes of the startup problem and how to speed up Windows 7?

There are two possible causes of the problem. Firstly, you should check if you have too many programs running at system boot-up. For the sake of safety, it is necessary to have anti-virus, anti-spyware software or security center run as Windows 7 boots up. But some people have many other unnecessary programs in their startup list too.

The more startup items, the slower your computer turns on. Because your system needs time to load necessary data and start the programs. If you set too many programs to run with system, you will find the boot-up process is extremely slow. So you need to disable some programs and eliminate them from the list.

If you have done what I suggest above but see no good results, it must be the registry that causes the slow starting of your computer. You may be wondering how registry can cause the problem. Registry is the data center of Windows system that contains all the essential data used for all the operational processes. It controls the basic processes like system restart, startup, shutdown and so on. And it also has a great effect on your computer performance, look for Windows 7 registry clenaup for great computer performance.

When Windows 7 starts up, it must communicate with registry and access the vital data. But the communication process could be slowed down by some redundant, invalid and empty registry keys and entries. These registry keys and entries belong to the programs that are uninstalled. They are supposed to be deleted but left during the uninstallation.

If you have uninstalled some programs and software from your computer, there would be too many useless registry keys in your system. The useless keys and entries would cause the communication between Windows 7 and registry very obstructed. And then your system starts up very slow. To make your system boot up faster, you need to clean up all the redundant, invalid and empty registry keys.
  • Digg
  • Del.icio.us
  • StumbleUpon
  • Reddit
  • Twitter
  • RSS
You are here: Home > , , , , , > Windows 7 Registry Clenaup for Great Computer Performance

Windows 7 Registry Clenaup for Great Computer Performance

Registry is the integral part of any of the operating system so is it with Windows 7. This registry database saves information about the programs running and/or not running on your system. This is very important point because it has been the case that some of the programs which we uninstall leave behind the registry keys. These add to the registry overload which may cause some system slow down. In such a situation one needs to fix registry erros. It is very simple to clean Windows 7 registry for achieving greater speed performance and consistency.

Some of the users who switched to Windows 7 are complaining that now their Windows 7 is running slow. They need not to worry about this because this is a common phenomenon that over time the Windows registry gets overloaded with massive information about the programs. There gathers a huge database of the windows registry keys. Some of them belong to the valid programs and, therefore, these registry keys are the valid registry keys. However, certain other registry keys contain information about those programs which were infected by the spywares and/or removed by the user from their programs list. The registry keys of such programs are not of any use. It is always better to purge Windows from such registry dirt to speed up your windows operating system

There are several techniques available for Windows 7 clean up. Not only there are various kinds of utilities available but the Windows own set of tools also contain some utilities to clean Windows 7 registry. These tools include disk defrag, system restore and control panel options. However, it is not easy for most users to play with these options and edit registry manually.

It is recommended for laymen users that if they want to make their registry free from registry errors they can use some efficient registry cleaner that is compatible with Windows 7 to repair Windows 7 registry errors and prevent crashes

Cleaning Windows 7 registry from time to time will help you to maintain the operating system and keep in good condition. It is also recommended that some free antispyware program is used to get rid of the spywares.

However, one thing shall be kept in mind that spywares leave behind the nasty spyware errors in the registry keys. It is necessary to remove these traces as well.
  • Digg
  • Del.icio.us
  • StumbleUpon
  • Reddit
  • Twitter
  • RSS
You are here: Home > , > How to Fix Windows 7 and Oe6 Error Code 0x800CCC

How to Fix Windows 7 and Oe6 Error Code 0x800CCC

Are you having difficulty trying to send an email message using the Windows 7 mail program? For the most part this program runs very well with little problems or needed input from you once it is configured and set up. The two biggest causes of problems in any email program are internet connectivity and/or improper account settings during set up. You have two options. If you have been searching the internet and help sites for hours now, stop. It only takes a few moments to delete and then re-create the account with the proper information. With the exception of Netscape Navigator you can re-create your account without losing your contacts or stored messages. Repeat, if you use Netscape as an email client then back up all of your messages and contacts BEFORE recreating your account or all of your contact information will be lost. If the problem is connectivity then there is nothing you can do except for call your internet service provider and talk to tech support.

The information you will need to create the account again is your email address and password as well as the incoming and outgoing server names for your provider. Your account name is in most cases your email address. Your display name is the name you would like people to see on the message you send. If connectivity is not an issue you can do a search for the email server names. So, once more you need:

- display name (your name)

- email address

- password

- username (email address)

- incoming server name (POP3, IMAP or HTTP)

- outgoing server name (SMTP)

Some internet service providers require that you use 'authentication'. If this is the case you must make sure to check the authentication check box provided in the wizard during your account set up. This check box is usually located on the server information screen of the wizard. I should mention that you can always access your account information located in your email client to make changes to your information should you need to. If this is something you feel comfortable doing then all you need to do to locate your information is to find it. This is almost always done by clicking on the TOOLS button at the top of the page and then clicking ACCOUNTS on the menu that drops down. Look for a MAIL tab and click that. (Have you backed up your contacts?)

Once you have clicked the mail tab you will see more tabs relating to server names as well as other account information. It is within this tabbed area that you can look for any mistakes you may have made when you initially set the account up. Or maybe the server names for your internet provider have changed. You can change that here too.

As you can see you need very little information. Setting up an email account in Windows mail or any other program is not difficult. All email clients have a wizard that will walk you through the steps of setting up the account. The most common connectivity or account related errors you will see are 0x800CCC91, which is due to a wrong or misspelled username that was entered during setup, and 0x800ccc0f which is lost internet connection. These are just two of the most common error codes seen. There are others that relate to things like attachments being to large or time outs due to filtering. There are a lot of things that can get in the way of you sending and receiving email and we have only briefly discussed the two that are seen the most.

Remember that if your issue is not related to connectivity you can easily find the server names you require to set up the account for the first time or to re-create it. There are a great many resources out there to help you with your issue. The trick is finding the right answers in a timely manner. If you need specific help then check the resource section for this article. It contains directions to specific email answers. No matter what the issue you are having with your email. A word of sage advice. Back up your contact list right now. Back up all those messages that you are hanging on to. You never know when something unfortunate may happen to your computer or your email program in general. Consider backing up your email information every six months. Put it on a disk or a thumb drive. Export it. Just do not lose it!

  • Digg
  • Del.icio.us
  • StumbleUpon
  • Reddit
  • Twitter
  • RSS
You are here: Home > , , > Windows XP Mode In Windows 7

Windows XP Mode In Windows 7


Windows XP Mode allows Windows 7 users to run Windows XP compatible applications in Windows 7. Windows XP Mode seamlessly integrates into Windows 7. Microsoft is aiming at day to day users who need to run XP compatible software programs that do not work correctly in either Windows Vista or Windows 7 natively.

XP Mode consists of the Virtual PC-based virtual environment and a fully licensed copy of Windows XP with Service Pack 3 (SP3). It will be made available, for free, to users of Windows 7 Professional, Enterprise, and Ultimate editions via a download from the Microsoft web site. XPM works much like today’s Virtual PC products, but with one important exception: As with the enterprise-based MED-V (Microsoft Enterprise Desktop Virtualization) product, XPM does not require you to run the virtual environment as a separate Windows desktop. Instead, as you install applications inside the virtual XP environment, they are published to Windows 7 Operating System as well. With shortcuts placed in the Start Menu users can run Windows XP-based applications (like IE 6) alongside Windows 7 applications under a single desktop.

The interesting aspect here is that the applications will run on the same single desktop. This is good for the end user who can concentrate working on one computer system. Microsoft can now not only claim full compatibility to Windows Vista but also to Windows XP which should make a huge difference in the perception of the new operating system.

Before we begin, you'll want to make sure your system meets the requirements:

* Processor: Processor capable of hardware virtualization, with AMD-V™ or Intel® VT turned on in the BIOS.
* Memory: 2GB of memory recommended.
* Hard disk requirement: 20MB hard disk space for installing Windows Virtual PC. Additional 15GB of hard disk space per virtual Windows environment recommended. Steps to Create a Virtual Hard Drive in Windows 7

How to Install Windows XP Mode in Windows 7

1. Download the Virtual PC beta from Microsoft Virtual PC page and also Windows XP Mode beta from here.

2. Install the Windows virtual PC beta by following the simple on screen procedure and reboot your machine to see Virtual Windows XP entry in your Start menu.

3. Now, Double-click on VirtualWindowsXP.msi package to start Virtual Windows XP wizard and click Next to continue.

4. Select the installation destination for the XP mode. By default it will select the right one. So, simply click Next button.

5. You will see the XP mode installation process. It may take few minutes to complete the installation.

6. Once you complete the installation, Virtual Windows XP starts for the first time. Here you will see Virtual Windows XP license agreement. Accept the license agreement and click Next to continue.

7. In the following window, you need to enter a password for the account. You cannot leave the password field blank. In case, if you don’t like to enter the password each time, you can check the option Remember credentials to store the password.

8. Next you need to configure Windows XP for automatic updates.

9. Once you are done with the configuration, Windows XP mode is ready to use.
  • Digg
  • Del.icio.us
  • StumbleUpon
  • Reddit
  • Twitter
  • RSS